Bottom
Previous
Contents
Chapter 8 - Disc Drives and File Management.
This chapter deals with the use of Floppy and Fixed (hard, internal) disc drives. Read this to find out the most efficient way of using your computer disc drives to record and permanently store charge decay data.
Disc drive overview
Early versions of the IBM PC and compatibles were supplied with one or two floppy disc drives, while current machines are normally supplied with at least one Fixed and one Floppy Drive.
The true division between the types of drive lies in the nature of the "media" - is it fixed (internal) or removable (external)? If the media is fixed, then its total capacity is limited: it is ideal for the storage of software which is required to be instantly available, such as your JCI155v4 Decay18 Charge Decay Software, your word processor, your spreadsheet program &c. It is not a good idea to use it for the permanent storage of data such as your Charge Decay Data Files, your word processed documents, and your spreadsheet data &c, since it soon fills up.
If the media is removable, then the limitation on total capacity is effectively removed. External media are ideal for permanent storage of data that is not to be very frequently retrieved, such as your Charge Decay Data Files, your word processed documents, and your spreadsheet data &c.
It is however generally true that removable media operate much more slowly than fixed media, and also the individual capacity of the most common removable media (floppy discs) is somewhat limited. Therefore a common scenario is that Charge Decay data are recorded directly on to a fixed disc, allowing rapid instant analysis, or the recording of large amounts of data from repeated runs under computer control without manual intervention to supply fresh floppy discs. After the Charge Decay data is collected, it must eventually be transferred to floppy discs for permanent storage.
Features of the disc drive and file management
Your JCI155v4 Decay18 Charge Decay software offers the following features to optimise the use of your discs drives:
- Drive List and Reserve Drive List.
- You can place the available drives in either of these lists, and select any of them for subsequent data storage. In computer controlled mode, drives in the drive list will be used up without manual intervention; when all are full, drives in the reserved drive list are used. Thus a machine may run unattended on repeated charge decay runs until all its storage capacity is used up. If linked to another computer using Microsoft® Interlink®, the capacity can be extended further.
- Copy and Transfer
- from a drive in one List to a drive in the other.
Taking the view that Charge Decay Data written to removable (floppy) discs is sacrosanct, and Charge Decay Data written to fixed (hard) discs is sacrosanct until it has been copied to another disc, individual directories together with the Charge Decay Data files and setup files in them can be copied or transferred from fixed to floppy discs for permanent storage, while retaining the full directory structure. Furthermore Deletion of Charge Decay Data files on fixed discs can be performed if they have been successfully copied.
- Moving directory contents
- Within certain reasonable limitations, it is possible to move the contents of a directory into another directory on the same disc, thus allowing early decisions on file classification to be changed.
- Format
- New discs can be formatted without leaving the program
Setting the drive lists
The principle is to set the drive lists with the drive letters in the order you would like them to be used. For the purpose of the examples below, a computer is assumed to be provided with two floppy drives A:, B:, two hard drives or drive partitions C: and D:, and an electronic Ram drive E:. If your machine lacks one or more of these drives, just leave it out of the drive lists. Recall that the Ram drive E: will lose all data stored in it if the power supply fails!
The drive lists are accessed by selection 3 of the main menu:
Disc drives and drive lists .. (format / change).
This leads to the Drive Operations Menu, shown below:
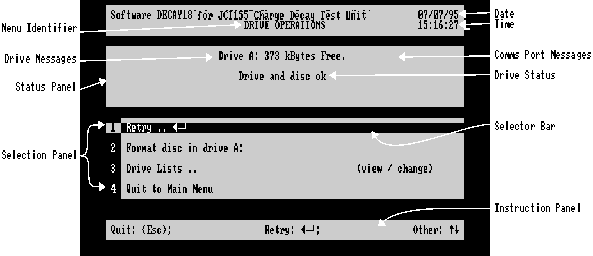
Figure 8.1 Drive Operations Menu
Make selection 3: Select Drive Lists .. (View / Change): this will lead to the Drive Lists Menu Figure 8.2 below:
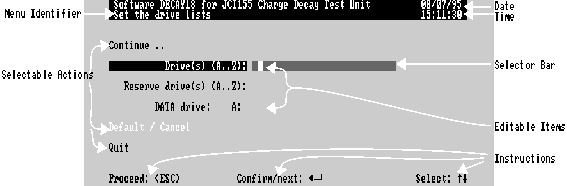
Figure 8.2 - Drive List Menu
Either drive list can accept up to 26 consecutive different alphabetical characters denoting drives, in the order they are intended to be accessed. Just select the drive list and type at the cursor to enter them. For more information on editing such items see Chapter 9. Don't use the same letter twice in either list or in both lists!
Single Decay Data runs in manual or computer control mode for immediate analysis
Type "CD" in the Drive list Drives (A..Z) to obtain rapid filing and reloading of data to speed analysis. In manual mode drive D must be manually selected when C fills up; no data will be lost. In computer mode, D will be selected automatically. Do not use E (ram drive) because of the risk of losing all data if power fails.
Type "AB" in the Reserve Drive list Reserve Drives (A..Z). In manual mode, these must be manually selected in the unlikely event of C and D being full, but they will automatically be selected when both C and D are full in computer mode. Operation will slow down somewhat. At the end of the Decay Data collection Session, or when C and D are full, the Charge Decay data on these discs can be transferred or copied to floppy discs for permanent storage, as described in File Management below.
Select Data Drive: and use  ,
,  to set the required data drive from the lists
Select Quit then Press  to return to the main menu.
Single Decay Data runs in either mode, or repeated, and especially unattended, Decay
Data runs in computer mode, where immediate analysis is not required.
Type "AB" in the Drive list Drives (A..Z) to obtain data that is permanently stored. In manual mode drive B may be manually selected when A fills up; no data will be lost. In computer mode, B will be selected automatically, allowing A to be replaced manually, while B fills up and vice versa. This requires minimum attendance to an otherwise unattended Decay Data Run.
Type "CDE" in the Reserve Drive list Reserve Drives (A..Z). In manual mode, these must be manually selected in the event that the supply of blank floppy discs runs out, but they will automatically be selected in the sequence given when both A and B are full in computer mode. This allows a long unattended run to carry on saving data, e.g. overnight. Replacing either A or B floppy discs with blank d
iscs will cause further data to be stored in said floppies, until they are both ful
l. In the order shown, E will only be used as a last resort! At the end of the Decay Data collection Session, any Charge Decay data on C, D or E can be transferred or copied to floppy discs for permanent storage, as described in File Management below.
Select Data Drive: and use  ,
,  to set the required data drive from the lists.
Select Quit then Press  to return to the main menu.
When a floppy disc fills up in manual mode ..
When a decay data file cannot be stored on a floppy disc which has filled up in manual mode, you will be presented with the Drive Operations Menu, Figure 8.1 above. (The menu's name will be replaced by the sample description to remind you what was to be filed). Read the status panel messages, which usually end with the instruction to:
Please replace with formatted disc or select another drive.
Formatting new discs
The normal response is to change the disc for a new one. The new disc may be formatted if required, but recall that formatting will destroy any information on the disc, so only format brand new discs. To format a new disc, be sure to remove the old one, then select and confirm selection 2:
Format disc in drive A: (or whichever drive was in use)
Now follow carefully the instructions given on screen by your computer's normal floppy disc formatting utility. When the formatting is finished, your Charge Decay data will be saved at once, and you will be offered the Analysis Preparation menu as if nothing had happened.
Changing the data drive
If a new disc is not available, then it is reasonable to use the fixed disc (if available) in order to carry on the work. Choose item 3:
Drive Lists .. (View / Change)
to proceed to the Drive List menu (figure 8.2 above), select Data Drive: and use  ,
,  to set the required data drive from the lists. Confirm this selection, then select and confirm Continue .., and the Charge Decay data will be saved at once, and you will be offered the Analysis Preparation menu as if nothing had happened.
File Management
At the end of a session of Charge Decay recording, there will often be Charge Decay data files on fixed (internal, hard) discs which need to be transferred to floppy (removable, external) discs for permanent storage). This software offers two options for transfer:
- Transfer - All Charge Decay data files in a given directory are transferred from a source disc in a drive selected from one of the drive lists to a destination disc in the first available drive of the other drive list. The files do not then remain on the source disc.
- Copy - All Charge Decay data files in a given directory are copied from a source disc in a drive selected from one of the drive lists to a destination disc in the first available drive of the other drive list. The files do remain on the source disc.
Two further related options are:
- Delete - All Charge Decay data files in a given directory may be deleted if both of the following conditions are satisfied:
- The files are stored on a fixed (hard, internal) disc;
- The files have been copied to a floppy (external) disc since creation, or have been copied to the fixed disc from such a floppy disc, using this program's file management.
- Move - all Charge Decay data files in a given directory can be moved into a sub-directory of that directory. The files so moved are still resident on the same disc.
Getting started with file management - an example
For the purposes of this example, and in order to give you some practice at file management, we will:
- Create a couple of Charge Decay data files in each of two sub-directories of a hard disc "C:", without analysing them immediately.
- rashly attempt to delete the files in the first sub-directory!
- copy the files in the first sub-directory to a floppy disc in drive "A:" for permanent storage.
- analyse the Charge Decay data of the files in the first sub-directory on drive "C:" to take advantage of the high speed of file operations
- reasonably delete files in the first sub-directory from drive "C:"
- analyse the Charge Decay data of the files in the first sub-directory on drive "A:" noting the low speed of file operations
- move the files in the first sub-directory from their directory on the floppy disc to another one.
- transfer the files in the second sub-directory to the floppy disc in drive "A:"
Step 1
- Set the drive list to "C", the reserve drive list to "A", and select "C:" drive as in "Setting the Drive Lists" above in this chapter.
- Create a directory and two sub-directories as described in chapter 5 under "Getting started with directories and sub-directories to hold decay data files"
- Do a couple of charge decay runs in each sub-directory, terminating each run by selecting "Repeat run" or "QUIT to Main Menu" as appropriate.
Step 2
Show that Decay Data files can't be deleted until they have been copied!
- Enter file \ directory picker from main menu selection 2 Access to data directories.
- Select and confirm appropriate sub-directories to reach C:\MAIN\SUBSID1\. The screen should now be similar to that shown below
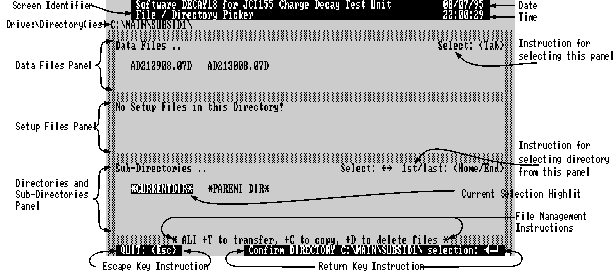
Figure 8.3 File / Directory Picker at step 2
- Notice the File Management instructions on the 2nd lowest line of the screen. Each instruction requires an
 +
+ where the appropriate key is the first letter of the instruction.
- Try to delete these uncopied files, by pressing
 +
+ . You will then enter the Delete utility which presents you with a message informing you of the file management option selected, and inviting you to confirm
  or abandon
  . Confirm the deletion, and the utility will perform the deletion, but only on files that have been copied! The screen will then appear as below:
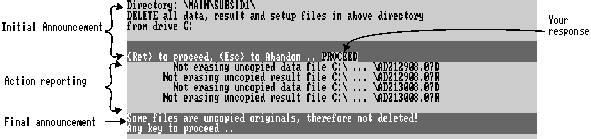
Figure 8.4 File Management Utility - Reporting attempt to delete
uncopied files.
- As instructed, press any key to return to the file / directory picker.
Step 3
Copy the files in C:\Main\subsid1\ to drive A:
- Ensure that there is a disc in drive A, with space on it, and this time press
 +
+ to Copy it. This time you will get the screen shown below. After you have responded to the initial announcement by pressing
  , the screen wil
l vanish on satisfactory completion to be replaced by the file / directory picker.
, the screen wil
l vanish on satisfactory completion to be replaced by the file / directory picker.

Figure 8.5 File Management Utility - Copying in progress.
Step 4
Demonstrate the speed of loading a file for analysis from the fixed drive
- Select one of the data files shown in the top panel of the file / directory picker, following the instructions in the top right of that panel.
- Load the file for analysis (confirm instruction, bottom right of file / directory picker). Note the loading time up to the point where the Analysis Preparation men
u appears.
Step 5
Demonstrate deletion of files copied to floppy (external) disc.
- Return to the file directory picker via the main menu selection 2.
- Select and confirm appropriate sub-directories to reach C:\MAIN\SUBSID1\. The screen should now be similar to that shown in figure 8.3 above.
- Try to delete these uncopied files, by pressing
 +
+ .
.
- Note that the files are Deleted, and you are automatically returned to the file / directory picker with current directory at C:\MAIN. Observe that the sub-directory "SUBSID1" has also been deleted, since there is now nothing in it.
Step 6
Demonstrate the speed of loading a file for analysis from the floppy drive.
- In the file / directory picker, confirm any sub-directory to enter the Drive / Directory Selection menu, which will appear as shown below (figure 8.6)
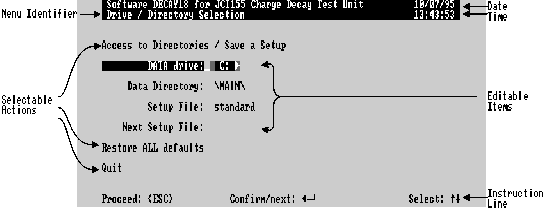
Figure 8.6 Drive / Directory Selection
- Use
 ,
,  or
or  to change Data Drive to A: (Reserve)
- Select and Confirm Access to Directories ..
- Skip the next menu that appears (SAVE a setup ..) by selecting and confirming item 1, File access / Drive and Directory selection. After a short wait while the data disc is checked, you will be returned to the File / directory picker. Note that the drive is now A:
- Select and confirm appropriate sub-directories to reach A:\MAIN\SUBSID1\ where the files were copied.
- Select one of the data files shown in the top panel of the file / directory picker, following the instructions in the top right of that panel.
- Load the file for analysis (confirm instruction, bottom right of file / directory picker). Note the loading time up to the point where the Analysis Preparation menu appears. It will be much longer than the time noted in step 4 above.
Step 7
Demonstrate moving files to a new directory.
- Return to the file directory picker via the main menu selection 2.
- In the file /directory picker, confirm any sub-directory to enter the Drive / Directory Selection menu, which will appear similar to figure 8.6 above.
- Edit the Data Directory to rea
d, say,
\MAIN\subsid1\group1.
- Select and Confirm Access to Directories ..
- Skip the next menu that appears (SAVE a setup ..) by selecting and confirming item 1, File access / Drive and Directory selection. After a short wait while the data disc is checked and the new sub-directory installed, you will be returned to the File / directory picker. Note that the drive a is now A:, the current directory \MAIN\SUBSID1\GROUP1
- Select and confirm *PARENT DIR* to reach A:\MAIN\SUBSID1\ where the files to be moved are stored.
- Select, but don't confirm, the newly created sub-directory GROUP1 which is the destination of the file move.
- Press
 +
+ to execute the file Move. The screen shown below will appear, showing the progress of the move. After you have responded to the initial announcement by pressing
  , the screen will vanish on satisfactory completion to be replaced by the file / directory picker.

Figure 8.7 - File Management Utility, Move in progress
.
- You may now select and confirm the new sub-directory group1 to ensure that your decay data files have been correctly moved!
Step 8
Demonstrate transfer of files to a floppy disc.
The two operations copy and delete are combined by transfer, which unlike move, doesn't change the directory, but does change the drive.
- In the Drive / Directory selection menu, change the data drive to C:
- Return to the file/ directory picker, and move to C:\MAIN\SUBSID2\. Recall that these files and their directory are not yet on the disc in drive A:
- Press
 +
+ to Transfer the files shown to drive A:. The screen shown below will appear, showing the progress of the transfer. After you have responded to the initial announcement by pressing
  , the screen will show the progress of the transfer as a series of copy / erase actions, then will vanish on satisfactory completion to be replaced by the file / directory picker.

Figure 8.8 - File Management, transf
er in progress.
If the destination disc becomes full during a Copy operation ..
You will be advised by the File Management utility if a copy operation is not completed due to a destination disc filling up. Press  to return to the file / directory viewer, and you will find the File Management instructions are changed to offer
  +
+ to Continue copying (for which you should insert a newly formatted disc),
  +
+ (to Reset copy flags), i.e. abandon the partial copy, so that copying can recommence from the start. If you quit the file / directory picker, without completing or resetting a copy, you will be presented with the same options when you return to the same directory.
Next
Top